Pages

Tuesday 31 July 2007

A busy weekend

Posted by Bonita

Well, another birthday has come and gone. No, not mine! We celebrated my dad's birthday this past weekend, and since he's not always keen on going out to eat, I cooked for him instead.

july31_01

Started off the day with brunch. My dad actually likes waffles. He's often requesting that I make them, although I don't make them often because my mom and I usually prefer pancakes, plus the thought of cleaning the waffle iron afterwards is a major turn-off for me. Alas, I gave in this time around since it was his birthday. I was lucky enough to pick up some really nice, fresh berries the day before, so I served those with the buttermilk waffles I made, along with some fresh whipped cream that I had lying around in the fridge. Add some bacon and some sauteed potatoes and you have a classic brunch meal!

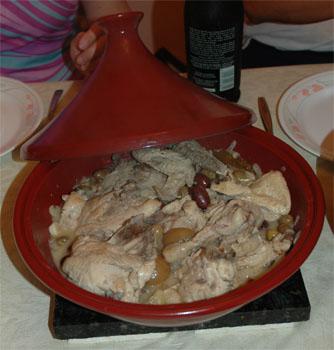
Recently on our trip out west, my aunt and uncle gave us a new toy to play with in the kitchen: an Emile-Henry tagine! We've never actually made anything Moroccan before at home, so we were excited to try out this new gift. I decided to make a classic tagine dish, Chicken Tagine with Preserved Lemons and Olives. The dish turned out nice enough, although I would definitely tweak the recipe I used next time, or just find another recipe all together. The amount of water they called for was really...unnecessary! Oh well...it still tasted good, even though I should also have been more patient when browning the chicken. That way, I wouldn't end up with such pale looking chicken!

july31_04

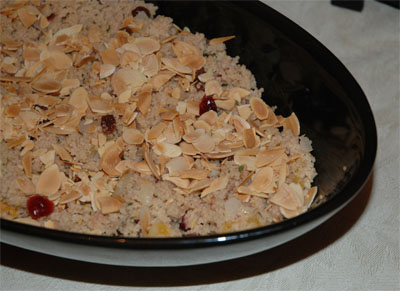
Served the chicken with a side of Couscous with Dried Fruit & Almonds. Absolutely delicious! The cumin and the cinnamon really comes through without overpowering the whole dish. The fruits add a nice sweetness and tartness to the dish, while the almonds add a nice, crunchy texture. It was definitely a pleasant sidedish, and we had plenty left. It's absolutely delicious cold too!

july31_02

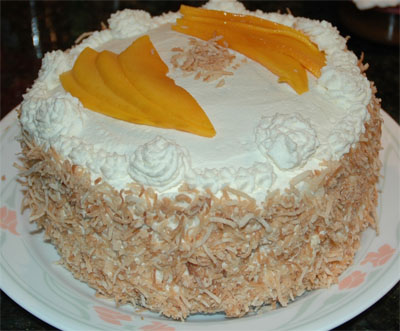
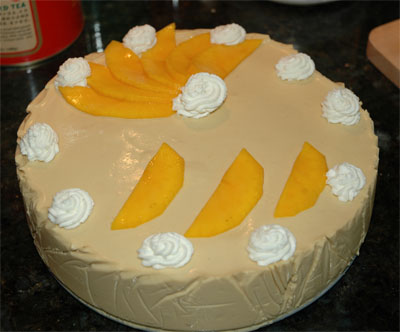
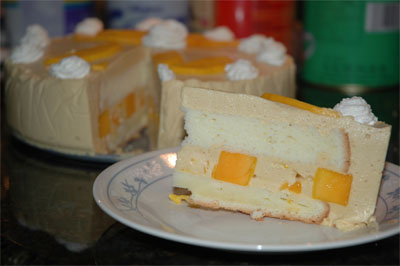
Dad's birthday cake was pretty simple, since he requested something simple. We still had plenty of mangoes left, so I made a simple Mango Cream Layer Cake, but with a twist. I added a 1/2 tsp of coconut extract into the cake batter to give it a hint of coconut, and then sprinkled toasted shredded coconut on the side of the cake. The coconut definitely added a really nice touch to the cake...gave it a more tropical look and flavour. Sadly, I'm still looking for the "perfect" sponge cake recipe. My sponge cake almost turned out nicely...but then in the end, I think I accidentally overbeat it when folding in the flour. Argh! Thus, the bottom of my cake ended up tough, hard and dry. Sigh.....

july31_03

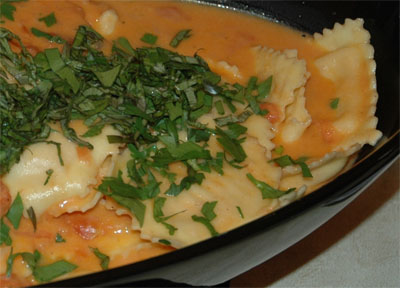
Sunday, I ended up making something simple and quick after having slaved away all day in the kitchen Saturday. We had picked up a bag of Lobster and Ricotta Ravioli the other day, so I simply made a tomato cream sauce to go with it. The pasta was absolutely delicious, and the sweet, creamy sauce complimented the delicate pasta perfectly without overpowering the filling inside. Mmmm...

july31_05

Bonita's Tomato Cream Sauce
  • 5 large tomatoes, peeled, seeded and diced
  • 2 large cloves garlic, minced
  • 2 large shallots, finely chopped
  • 1/4 cup Vodka plus 1-2 tbsp Brandy
  • 1/2 cup cream
  • Half a lemon
  • Olive oil
  • Salt and freshly ground peper, to taste
  • Fresh Italian parsley and basil, julienned
  1. Peel, seed and dice tomatoes. Set aside.
  2. In a large saucepan over medium heat, heat some olive oil. Sauté the shallots until softened and translucent, about 4 to 5 minutes. Toss in garlic and sauté until garlic is starting to turn golden, about 1 to 2 minutes.
  3. Take saucepan off heat. Add in the vodka and brandy. Return to heat. Let the liquid boil down until reduced by half, about 5 minutes.
  4. Add in the diced tomatoes. Season tomatoes with salt and freshly ground pepper. Let simmer for 10 minutes, uncovered.
  5. Stir in the cream. Let the sauce thicken a bit, about 5 minutes. Add a squeeze of lemon.
  6. Add in 1 lb of your favourite pasta, cooked al dente. Toss so that pasta is well combined. Serve, sprinkled with the parsley and basil.

Sunday 22 July 2007

Around town

Posted by Bonita

My parents have been meaning to take me this a local Farmer's Market for some time now. However, it seems that whenever we have a Sunday where we're actually free, it would be raining cats and dogs. We finely made our way down to the market today with the gorgeous weather outside. It wasn't a terribly large market, but they were all selling locally grown produce or locally made products, like sausages, jams, baked goods, etc. We ended up picking up some fresh veggies: broccoli, new red potatoes, a cabbage, a bunch of sweet Spanish onions and a dozen sweet corn.

july22_05

Since we were in town, I wanted to swing by the Byward Market, one of my favourite places here in Ottawa. It's an absolutely beautiful place, with the market itself, cute boutiques and many many restaurants. However, before heading to the Byward area, we made a quick pit-stop at Bridgehead for some coffee. Bridgehead is actually a local coffee chain that specializes in fair-trade and organic coffee. Coffee was good, definitely comparable to Starbucks, although I still think Starbucks has the strongest, most potent brew (mmmm....).

july22_01

With a coffee in hand, I thought that I was missing something to go along with my coffee. There's a lovely little French bakery in the Byward area, The French Baker, which features probably THE best croissants in the whole city. The are made with pure, all butter, resulting in a super rich, super flaky (and super fatty) croissant. These pastries are actually hard to come by because they fly right off the shelves. There's always a huge line-up right out the door on weekends, and they sell out quite quickly. But hey, if you're going to have a croissant, you might as well have the real deal. It's what I imagine the croissants in Paris would taste like. Fresh out of the oven, we picked up some plain butter croissants and chocolatines to go along with our coffee. A delicious, truly decadent Sunday brunch!

july22_02
Plain, all-butter croissant. Mmmm....

july22_03
A true French pastry, the chocolatine.

july22_04
The French Baker
119 Murray Street
Ottawa, Canada
613 789 7941

Saturday 21 July 2007

If at first you don't succeed, try try again...

Posted by Bonita

july21_04

That's what I kept repeating to myself after last night's bread failure. If you've ever been to an Asian bakery, particularly a Chinese or a Japanese one, you'll often find "milk bread," a really soft and fluffy white bread loaf that's completely square. It's honestly one of the best taking breads I've ever had and I really love it, along with my mom. Unfortunately, we don't have it very often. There's a really great Japanese bakery in Markham that bakes really great bread, and after coming across a few recipes for Hokkaido Milk Loaf, I thought that I would also give it a try myself.

I don't really know much behind the story of the this bread, but I believe it's called Hokkaido Milk Loaf is because the original bread actually uses the expensive milk from Hokkaido, Japan. I actually found two recipes online for Hokkaido Milk Loaf, one which used butter while the other didn't and both not requiring the use of real Hokkaido milk. Unfortunately for me, both recipes are written purposely for a bread machine, something I don't have, which meant that I had to fiddle around with the directions. After some deliberation, I decided to try the recipe with butter first. Let's just say that was a complete failure. After baking, my bread came out completely flat and had the texture of a cake rather than a loaf of bread. To say that I was greatly disappointed would be an understatement. There are a few possible reasons that it turned out to be a failure: a) The recipe called for too little yeast. Three grams of yeast? That's nothing... b) I might have messed it up a bit right before I put it in the oven. Ooops! c) I might have over-proofed it. Since the recipe was for a bread machine, I decided to actually go out of my way to purchase some instant yeast and try it out. Now, I have no experience with instant yeast whatsoever; I've always been an active yeast kind-of-girl. Thus, with my inexperience with instant yeast, there is a good probability that I might have over-proofed my bread.

july21_01

Whatever the reason, my failure at my first attempt at milk bread did not discourage me. I woke up this morning and tried out the second recipe, this time going back to my familiar active dry yeast. The results? Major success! The bread rose beautifully...as much as three times compared to my failed milk loaf. The texture is really soft and fluffy, with a close grain, very similar to the milk loaves that I've eaten in the past. It's definitely a bread that I will be making again in the near future!

july21_03

There were a few things I changed. I kept true to the ingredients and the amount used, but I changed the directions because I used a stand mixer rather than a bread machine. Furthermore, I didn't have a extra-long loaf pan; rather, I used an 9x5 inch loaf pan. Therefore, I used 3 of the 4 balls of dough to make the loaf, and with the leftover ball, I simply split it into 4 equal parts and rolled them into individual buns.

I've included the recipe below. Credit for the recipe belongs to Angie's Recipes; however, I've adjusted the directions to be more user-friendly for bakers who don't own bread machines like myself.

july21_02

Hokkaido Milk Loaf
Adapted from recipe here
Makes one 9x5-inch loaf and 4 small buns
  • 540 g bread flour
  • 60 g cake flour
  • 10 g dry active yeast
  • 30 g milk powder
  • 80 g sugar
  • 9 g salt
  • 1 large egg, lightly beaten
  • 250 g warm fresh milk (105°F-115°F)
  • 150 g tepid whipping/heavy cream (90°F)
  1. Dissolve yeast and 1 tablespoon of the sugar in the warm milk. Let stand until foamy, about 10 minutes. Sift together the bread flour, cake flour and milk powder. Set aside.
  2. In the bowl of an electric mixer fitted with the flat (paddle) beater, combine the whipped cream, egg, salt, the remaining sugar and 1/2 cup of the flour mixture. Beat on medium speed until creamy, about 1 minute. Slowly add the yeast mixture and 1/2 cup of the flour and beat for 1 minute. Add the remaining flour mixture, 1/2 cup at a time, until thedough pulls away from the sides of the bowl. If dough remains sticky when all the flour runs out, add some bread flour, a handful at a time.
  3. Switch to the dough hook. Knead on medium-low speed, adding flour 1 tablespoon at a time if the dough sticks, until smooth and elastic, about 5-7 minutes. Cover with a damp towel and let rise until doubled in size, about 1½ to 2 hours.
    (N.B. This is really subject to the weather in your area. I usually like to warm my oven a bit and then let the dough proof in the warm oven.)
  4. Take out the dough and press out the gas produced during the proof. Divide it into 4 portions. Round up and let rest for about 20 minutes. Roll 3 of the 4 portions out, roll up swiss-roll style, pinch the ends and tuck under, and place in a greased 9-by-5 inch loaf pan. For the remaining portion, divide into 4 equal portions and shape them into buns (make whatever shapes you want!) and place on a parchment-lined or greased cookie sheet. Cover dough with a clean dishcloth and let the dough rise till is has increasedin size by about 80%.
  5. Preheat oven to 325°F. Brush top of bread with egg wash or milk. Bake for about 35 to 40 minutes (the buns will only need about 20). Take out of oven and let rest for 20 minutes. Turn the loaves out onto wire racks and let cool completely.

N.B. I've decreased the oven temp to 325°F because I was using a panwithout a lid. It's unfortunately that I don't own a Pullman pan to get atruly authentic-looking (as well as tasting) Hokkaido milk loaf, but this methodstill yields a great looking and great tasting loaf. But each baker knowshis/her oven best...so it's at your own disgression! Also, it's key to letthe loaf rest for 20 minutes before you even attempt at getting it out of thepan. Trust me...I've learned the hard way in the past by beingimpatient. You'll end up with a mis-shappened loaf. Give it the 20minutes to sweat so that when it comes time to turn it out of the pan, it'll slide right out without any problems.

Friday 20 July 2007

A Sweet Treat

Posted by Bonita

july20_03

There's something special about European cookies. Whereas your average American cookie is usually a drop cookie or a freeze and slice cookie, something that's fast and easy and simple to make in our busy, hectic lives, I find that cookies from abroad tend to require a lot more time, a lot more patience and a lot more love. But despite all the extra work, it's all worth it in the end. I really do love European cookies, even though I don't make it as often as I would like, frankly because I too don't usually have the time to spend on cookies.

I was in one of my baking moods today and really wanted to make cookies. I tried making Rugelach two weeks ago, and while they didn't taste bad, I did have some problems with them. Both the dough and the filling were hard to work with, and in the end, I had pretty ugly looking cookies. However, the problematic cookie did not discourage me. I went back to internet to search out another Rugelach recipe I could try out, and found one over at one of my fave food blogs, Milk and Cookies. The recipe looked appealing enough (plus the pictures of her cookies were the real clincher), and fortunately for me, I had all the ingredients on hand. Thus, I whipped up the dough in less than 10 minutes in the afternoon and popped them in the fridge so that they would be ready for me after dinner.

The assembly of these cookies does take a bit of time, but it's really very simple. Mostly just a lot of measuring and a bit of chopping, but once you have all your filling ingredients in front of you, the rest is pretty easy. This dough was absolutely a delight to work with. Compared to the other previous rugelach dough, this dough still had a bit of softness to it coming out of the fridge, which made it so much easier to roll without cracking on me.

july20_01

Once I rolled it out to about the right size, I spread on my filling ingredients on top. Sliced the dough with a pizza cutter into 16 triangles and rolled them up crescent-roll style. Gave me no trouble at all. I opted to forgo the glaze and sugar topping and just popped them into the oven after chilling them for 30 minutes, as was directed. When they were done, I took them out of the oven and let cool for 5 minutes on a rack before dusting them with icing sugar. These cookies are absolutely delicious. The pastry is nice and flaky and filling is to die for. The combination of the apricot jam, cinnamon sugar, dried currants and chocolate is surprisingly delightful, and it makes for a real treat when you bite into one of these cookies. The good thing is that these are pretty small in size, so I don't feel as bad when I indulge in one...or two.

I also made Lemon Drop Cookies for my best friend this morning, who I haven't seen for awhile. I'm always happy to bake when I have an excuse, so what better reason than to make some for a friend, especially one who loves my baking! These cookies are really simple and you can whip them up in 10 minutes flat. They're actually called a drop sugar cookie, but it departs from your traditional sugar cookie because it's not crisp, nor does it contain any butter (**gasp**). But do not cringe! Just because it's missing butter doesn't mean these don't taste cook. They're really heavenly. These cookies rather have a more cake-like texture to them, soft and light. Plus the hint of lemon in these makes these cookies to die for. This recipe was actually passed on to me by a really close family friend.

july20_02

Lemon Drop Cookies
Makes about 2 dozen
  • 2 cups all-purpose flour, sifted
  • 2 tsp baking powder
  • 1/2 tsp salt
  • 2 large eggs
  • 3/4 cup sugar (plus additional sugar for topping)
  • 2/3 cup vegetable oil
  • 2 tsp vanilla extract
  • 1 tsp grated lemon zest
  1. Sift flour, baking powder and salt into a medium bowl and mix well
  2. Whisk eggs in a large bowl until blended. Add sugar, oil, vanilla extract and lemon zest and mis well. Stir the dry ingredients into egg mixture until blended. Chill, covered, for 30 minutes or longer.
  3. Preheat the oven to 400°F (if you know that your oven runs really hot, you might want to decrease it to 350-375°F).
  4. Drop the cookie dough by rounded teaspoonfuls 2 inches apart onto ungreased baking sheets. Mist the bottom of a 3-inch flat-bottom glass with water and dip glass in additional sugar. Press the top of each cookie lightly with the glass to flatten, misting glass with water and dipping in sugar before pressing each cookie.
    (N.B. Alternatively, you could try rolling the cookies into a ball by hand, and then rolling them in sugar before pressing them. I haven't tried this method yet but I'll probably give it a go next time I make it, only because none of my glasses have a completely flat bottom and it was frustrating how the sugar wasn't sticking to the bottom of the glass very evenly.)
  5. Bake cookies until lightly browned, about 8 min. Cool on baking sheets for 2 minutes. Remove to wire racks to cool completely.

Tuesday 17 July 2007

Mango Tango

Posted by Bonita

It's mid-July, and that could only mean one thing...mango season! Having just come back from Toronto, we knew that the asian supermarkets would be stocked with mangoes, and naturally, we stocked up on some. Well...more than some. Who would have thought that we'd end up lugging home with us 26 mangoes? Yes...26. We're slightly crazy...

july17_02

But having so many mangoes around meant that I could finally make a Mango Mousse Cake, something that I've been dying to try for awhile. Now, I'll be honest, I'm not a big fan a mousse cakes. I'd probably would have enjoyed eating a mango cheesecake more than a mousse cake. But mousse cakes are quite popular amongst Chinese cake shops, so I thought I'd would pay homage to the mango mousse cake myself. I found a recipe here and gave it a try.

As you can see, this cake needs work. First of all, the sides of my cake were sloppy. That's my fault really. I don't have those fancy plastic cake strips to line my cake pan, and my attempt at lining the cake pan with parchment paper failed (leaving me very, VERY frustrated), so I had to use plastic wrap instead. It meant having to compromise the beauty of the cake because the plastic wrap would leave its mark on the cake.

As for the taste test, it needs improvement. First off, there wasn't enough mango flavour to the cake. Perhaps if I add more mango puree to the mix next time (while decreasing the amount of cream used) and perhaps adding a few more drops of mango extract might help. Also, my cake layers were a little too thick in my opinion. I would definitely cut thinner layers next time (again, I only had myself to blame. Me and my poor blade work.). And lets not get started on the decoration itself. God knows what I was thinking. I wasn't actually...I just sort of haphazardly plunked down mango slices and piped out whipped cream, so it's not the most attractive cake. Makes it look so amateurish...at best...

july17_01

Another troublesome aspect about the recipe was that, because it came from Hong Kong, I had to convert some of the measurements, which was also a bit of a pain. All in all, I think this recipe needs work, although it gave me some sort of base to work from if I do attempt this cake again in the future.

Not sure what my next experiment will be. Perhaps Japanese Cheesecake? I've also been dying to try that, and I've been craving cheesecake for awhile now. But to be quite frank, I'm desperate for some more mouths to feed and help taste test for me...

Monday 16 July 2007

Visiting Family Leaves Its Mark

Posted by Andrew

Man, I know I've been spoiled by especially my Mom and sis when they visited me as part of our trip to the Rockies last month. My family decided to stay in town another week before we went our separate ways from Winnipeg during the Canada Day long weekend. In that time Mom managed to make me some nice dishes including lobster in ginger and green onion sauce. Bonita also delighted me with some of her cooking and baking. Her last Wednesday night here, she made choco-espresso biscotti for my colleagues the next morning; they went quickly. Friday morning, she made blueberry muffins, and they, fresh out of the oven, went even more quickly. And of course, she made that chocolate mousse cake for my belated birthday.

To top it all off, my sis made me a large batch of veggie lasagna. OK, so normally I don't go veggie, but I thought it wouldn't hurt to cut back on the meat just a bit once in a while, and according to my sis she finds the veggie recipe more appetizing. On top of that, it's got mushrooms and spinach instead of beef, and since I can handle mushrooms and spinach very well, why not try it? So, with that she made one for me and popped it in the freezer, ready to be cooked and eaten at my whim.


Bonita, thank you for the lasagna, it was very good! Of course, there was so much of it I could only eat one quarter of it on Saturday night. (To give you folks out there an idea of scale, the width of the glass pan is about 30cm or 1'.)

Sunday 8 July 2007

Christmas in July

Posted by Bonita

july8_05

Alright, so it WASN'T quite Christmas, but it sure felt like the holiday season with the amount of cookies I've been baking these past few days. I've only been back for 2 days, barely enough time to unpack, do a couple loads of laundry, repack my bags...oh yeah...and make some treats for my relatives when I head to Toronto tomorrow. But hey, I'm certainly not complaining after having been away from my kitchen for the past three and a half weeks. Does it make me slightly crazy if I told you that I actually hugged my Kitchen Aid when I got home? Yes...yes I did.

july8_04

While I'm not fortunate to have the Food Network here at home, my lucky brother does, so during the times when there was nothing to do, I'd have the FN on. A few shows were making jam, Jamie Oliver with his strawberry jam on Jamie at Home and Laura Calder's apricot preserves on French Food at Home. Now, I've never been a jam-fan. I've always found them to be sickeningly sweet, but I've started to get over my aversion for them this year with my new-found love for Greaves' raspberry jam. Yet, despite not being a huge jam fan, watching the likes of Jamie and Laura make jam got me into the mood of making jam, even if I didn't plan on eating it myself. Thus, 9 lbs of fruit, 8 cups of sugar and lots of loving tender car later, I'm left with 4 jars of strawberry jam and 6 jars of apricot jam to give away. Well...actually, make that 3 and 5 jars to give away. I think I'll keep one of each. Nothing beats homemade, and I think I might have a new crush with these lovely jems. My mom was smart to bring out a loaf of bread I had baked awhile back ago from the freezer, and it was lovely toasted with a bit of butter and my apricot jam. Yummy!!!

As for the cookies, I made Cinnamon Hazenut Biscotti and Cranberry Pistachio Biscotti because my aunt loves my biscotti, but have yet to try these ones. My little cousin also loves the butter cookies that I make for him, where I usually sandwich some jam in between. However, feeling slightly lazy this time around (more like I didn't want the hassle of washing out my cookie press afterwards...), I decided to make him Jam Thumbprints this time around.

july8_02

As for my other aunt, I made these lovely Jam Sandwich Cookies, thanks to a recipe from Cream Puffs in Venice (a really amazing foodblog!) and Apricot and Walnut Rugelach, inspired by the recipe at Williams-Sonoma. These cookies did take considerably more time to make, since it required making the dough, chilling it, rolling it out, and assembling them. The rugelach was a bit of a pain to make, but they did turn out pretty nice in the end, although slightly ugly in my opinion. However, the more you roll the cookies, the easier it gets, so my 2nd batch was definitely looking nicer than my 1st batch. The jam sandwich cookies took a lot of time too, but it was definitely worth it once you pop one of these treasures into your mouth. They literally melt in your mouth. I used raspberry and peach jam in between the shortbread cookies, although I do favour the raspberry cookies more (no surprise there). Both beautiful to look at AND tastes great, these gems were definitely the highlight of my baking weekend.

july8_01

The end? Not quite. You'd think it would be after the scary amount of sugary sweets I have concocted already. I still have a banana bread on my "To Do" list, so I guess I'm off to get started on that. I'll see you next week!!!

Saturday 7 July 2007

Back to Wasabi

Well, I finally took my family to Wasabi on Broadway last Saturday, and I knew at least my sis and I would absolutely be indulging ourselves on sushi. Mom can handle the stuff alright as well, but Dad is another story. Imagine my surprise then when he tried the New Style Sashimi and said he actually really liked it! Man, this chef must be doing something really right then!

With at least another sushi lover with me I was able to try some more stuff this time around.

To start things off, we all had our own orders of sunomono salad, the special that night being the lobster claw. Since the claw was fully cooked we knew Dad could easily handle that, and it was superb! The salad was light, perfect for a hot summer day. Bonita was the first of all of us to notice that the salad dressing was spiked with a hint of miso, and she realized that with a bit of trial and error she could do something similar at home herself. Beneath the lobster claw is a bed of shredded cucumber and mung bean vermicelli with a rice wine vinegar & miso dressing.

Next Bonita and I had New Style Sashimi, the tuna upgraded to bluefin. I won't describe the dish again, but suffice it to say that my sister loved it, and even Dad was able to enjoy it as well! There are three slices each of bluefin tuna, salmon and Chilean sea bass.

Dad ordered the Salmon & Tempura entree, one of the few fully cooked dishes available at this restaurant. The salmon was cooked just right to still be moist inside.

Mom ordered the (Chilean) Sea Bass & Tempura entree. They weren't kidding when they said the sea bass was marinated for 3 days, this melt-in-your-mouth fish had a punch of flavour through and through.

These are two of the three sushi dishes Bonita and I first ordered. The one with the green tobiko (flying fish roe) is "Mango Tango", with mango, avocado, alfalfa sprouts and tempura shrimp drizzled with wasabi mayo. The ones further back are the "Godzilla Roll", with avocado, tempura shrimp and fried soft shell crab. Delicious!

This was the third dish, the "Volcano Roll". Inside the roll is avocado and eel. The wam sauce draped over the sushi pieces is made of spicy mayo, tobiko and chopped scallops. Of the sushi I had that night, this is still perhaps my personal favourite.

With Bonita and I still having room in our stomachs, we ordered a bit more. This one if memory serves me right is "Ocean Jewel", with avocado, king crab and asparagus, the roll wrapped in the usual nori (seaweed) and sweetened egg as the outer wrapping.

This is toro (tuna belly) sashimi, the cut of all cuts in Japanese sushi cuisine. They were absolutely heavenly, and I was a bit surprised that Dad could tolerate it pretty well, considering this is the fattiest, and therefore the most flavourful, part of a fish. Furthermore, tuna fat melts at a low temperature, the flavour "oozing" once that piece hits your tongue.
Lastly, we decided to try the beef version of New Style Sashimi, and though the flavouring was just as nice as the fish version, unfortunately with beef you do have to deal with some tougher parts of the meat, though the chefs are not to blame for this. Each slice of beef here is wrapped around a slice of fresh shiitake mushrooms.